
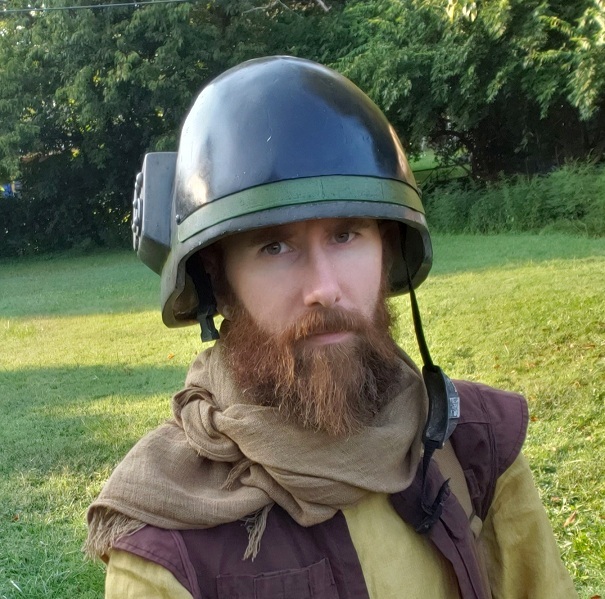
As we’ve seen before, scarves and headwraps are absolutely legitimate pieces of in-universe headwear, but if I had to make a list of commonly-seen ‘reenactorisms’ which have the power to derail my appreciation of an otherwise-solid GFFA outfit, an off-the-shelf, Earth-y, two-tone shemagh/keffiyeh headscarf would have to be near the top. (Also up there? Those zipper-covered, holster-wannabe, drop-leg fanny packs.)
These items are super useful for all sorts of authentic adventuring uses besides looking cool and keeping the sun off one’s head (improvised gathering container, level-one water prefilter, bandage/sling, last-ditch cordage source, etc); however, your standard two-color shemagh has some issues.

–Visually, prints or busy motifs are rarely seen in GFFA ‘soft kit’ – solids are by far the rule. (Especially in the Classic Trilogy period; in the Prequels, more variation is seen, but this is typically accomplished by embroidered details, not the actual weaving.)
–Thematically, there’s nothing wrong with channeling an ethnic fashion sense for SW purposes…a good scarf or headwrap can make you feel like a romantic desert rebel (Lawrence of Arabia, the Fremen of Arrakis, etc) which is a perfectly valid GFFA character type! However, in the 21st century, mass-produced shemaghs have a tendency to feel more ‘tacticool prepper bro’ than ‘exotic native insurgent’.
–Politically (because of their association as a ‘tactical’ accessory), the shemagh has been embraced by various anti-democratic groups…and we absolutely want to distance ourselves from that kind of sithspit.
BUT what if I told you that for about the same price as an Amazon-bought shemagh, you could make your own headscarf that’s even better? If you want to easily level up your Star Wars costuming and gain some DIY XP, read on!
What exactly is a shemagh? It’s really just a big square of fabric…but not all fabric is created equal. Like the vast majority of Star Wars costumes seen onscreen, your best choice is a 100% natural fiber fabric—cotton, linen, wool, silk, hemp, nettle, etc.—which can be blended together or just a single fiber. Avoid synthetics if at all possible (polyester especially); those materials simply don’t have the right ‘look’ for the authentic GFFA (more on this later). If you want to keep cool in the sun, I highly recommend linen – it’s more sustainable, breathes better, dries faster, and is antimicrobial (= less sweat stink!).
Now, there are a couple ways to get your fabric and stay on budget.
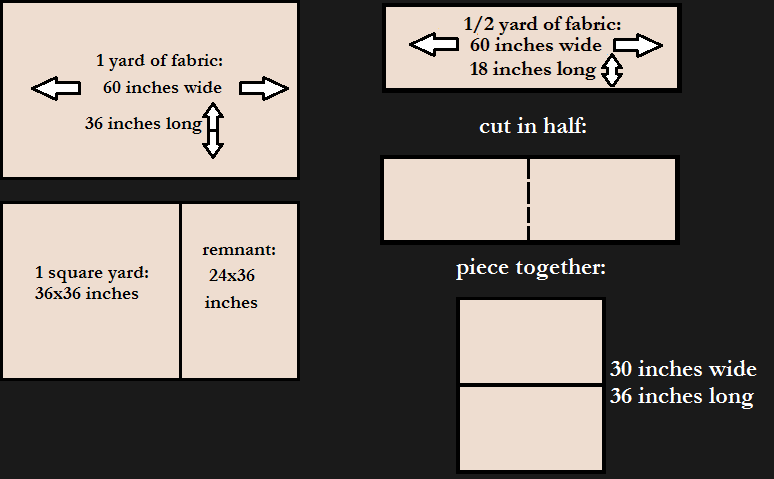
Fabrics-Store.com (basically the best place for linen online, at least for those in the States) regularly has sales on various colors, or you can check out the ‘doggie bag’ section and really save some money. The smaller the cut the higher the savings, but for your shemagh you’ll want about a yard (although I guess you could always go bigger!)….my purchased shemagh is about 46 inches square.
As you can see below, if you get two ½ yard pieces, you can sew them together to make your square yard; a single ½ yard piece can make a shemagh that isn’t a perfect square, which is fine too). If you buy 2 yards, you could make a really big (60″) square!
The one downside to FS is the shipping…unless you’re buying a TON of fabric, the shipping is usually around $15. That doesn’t hurt too much when you’re buying 10 yards, but for a measly ½ yard or two it seems like a poor choice. But don’t despair, you might have a closer option for cheap linen!
At my local Joann’s fabric, their solid-color 100% linen is normally $22/yard – way pricier than even the nicest F-S stuff. However, their coupons regularly rotate, and if you buy something (pack of gum, single bottle of craft paint, etc) your receipt will usually come with a coupon for at least 25% off, usually more like 40%. Last week there was a coupon on their app for 50% off a single cut of fabric, which would make their 100% linen just $11/yd! Score!
Whatever you’re using, once you have your ~yard of fabric (I’m using an open-weave 5-ounce IL041 in ‘Fog’ from F-S, (which I bought mistakenly by failing to read the fine print and didn’t realize it was open-weave) you’ll want to prewash to remove any residues or fabric treatments and soften the fibers. To keep things from unraveling, you should first secure your raw edges.
Now it’s time to wash. I like to use warm water, and then tumble dry on a medium heat (to help preshrink the fibers) with three wool dryer balls.


Once the fabric is dry, don’t start cutting yet! The drying process probably caused the fibers to shrink lengthwise (making the fabric rumpled), so if you cut now your piece might not be the right size later. To help the fibers relax, we need to iron it flat (this also makes measuring easier). Once your fabric is ironed, you’re ready to get started for real.
First, we’ll make a square. From the inside of your selvedge (the tightly-woven band along the edge of the fabric), use a measuring tape or yardstick to measure the size of your scarf. To make our perfect square (assuming your fabric is plain weave) we’re going to pull a thread. This will leave a gap between the threads that make it easy to cut a straight line. Just pick out a thread or two with a pin and start pulling.
If you want to match the tasseled look of a purchased shemagh, you’ll want to decide which method to use. Of the two ways below, the first one will reduce the overall size of your shemagh, so think about how big you want the final product to be.
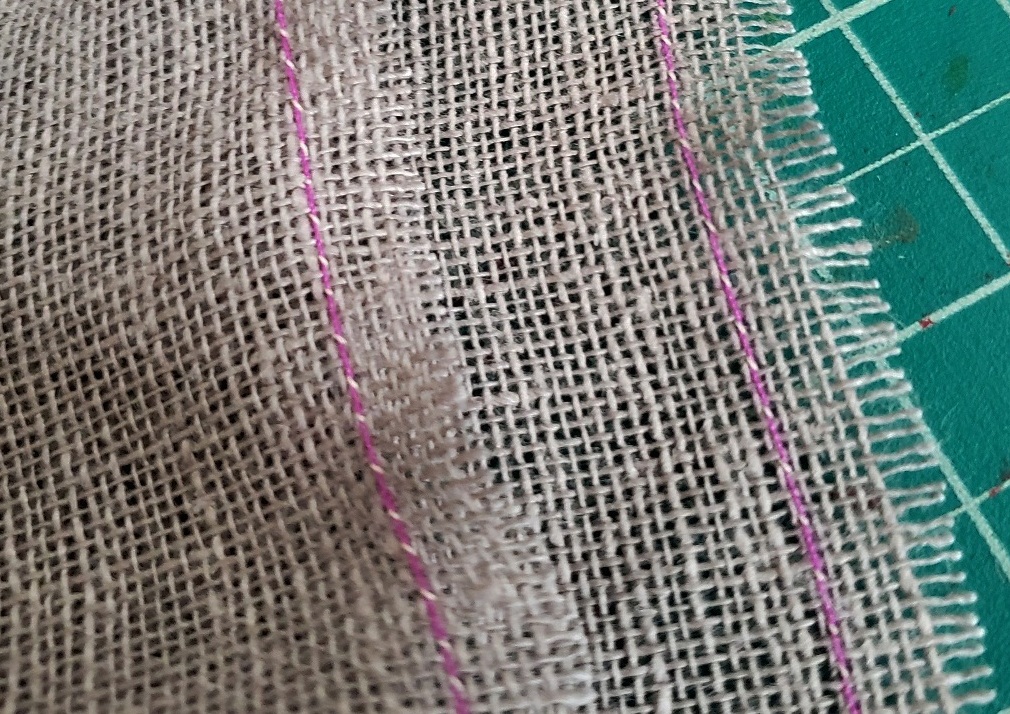
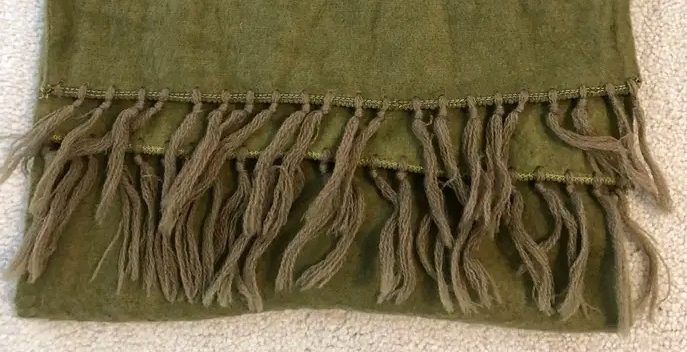
If you want your tassels to be made like a store-bought shemagh, you’ll need to carefully unravel the material itself. For each side you want to fringe, sew a basting stitch 3 inches from the edge that will keep the threads from unraveling (AND keep the fabric from tearing between the tassels). Try to use thread that matches your fabric as close as possible.


Rather than marking a line to follow, I found it was easier to pull another thread and follow that on the sewing machine. Once you’ve sewn your basting stitch, pull the threads from the edge that parallel it until you reach your stitched line. Then, tie the loose threads off every inch or so in an overhand knot.
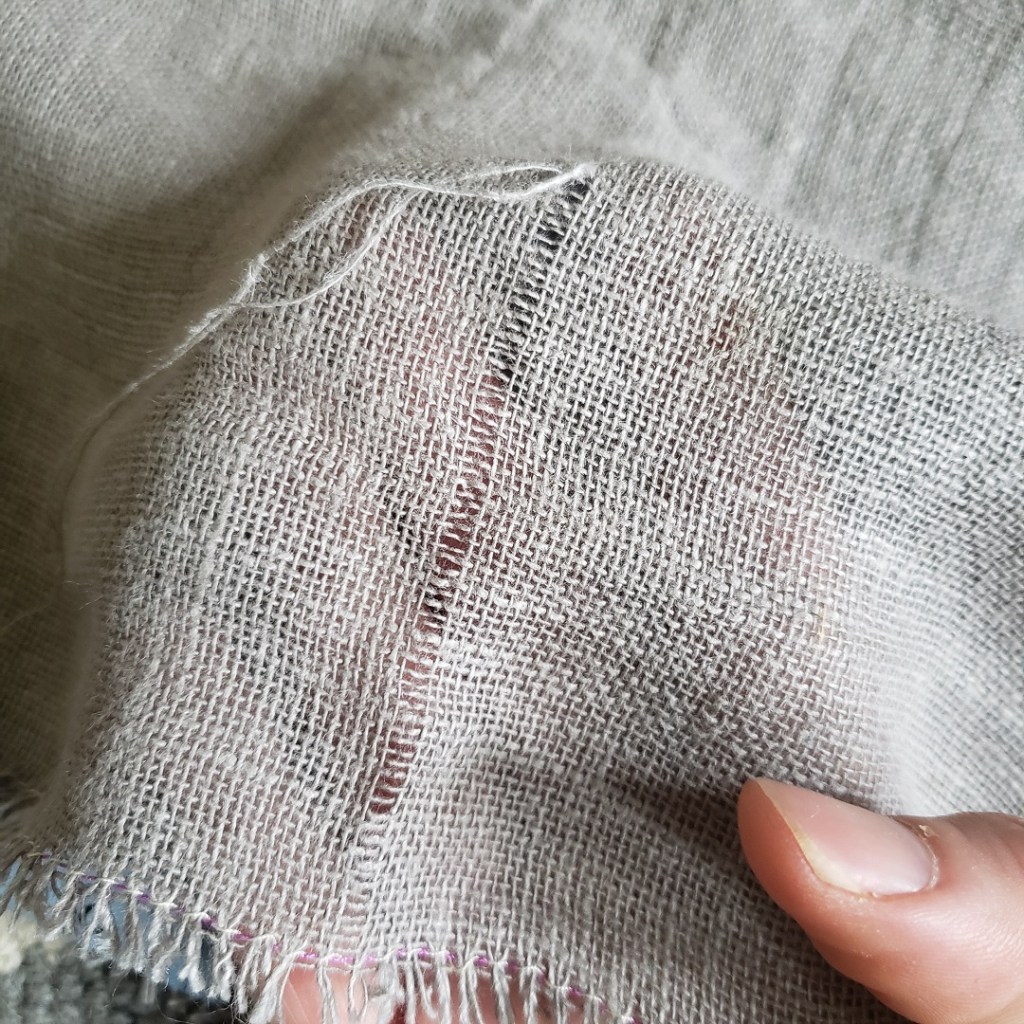
Applying your fringes as separate pieces will use less woven material. This style can be seen on USGI WWII scarves – a section of tassel material is pulled through the edge and tied in a ‘lark’s head’ knot:

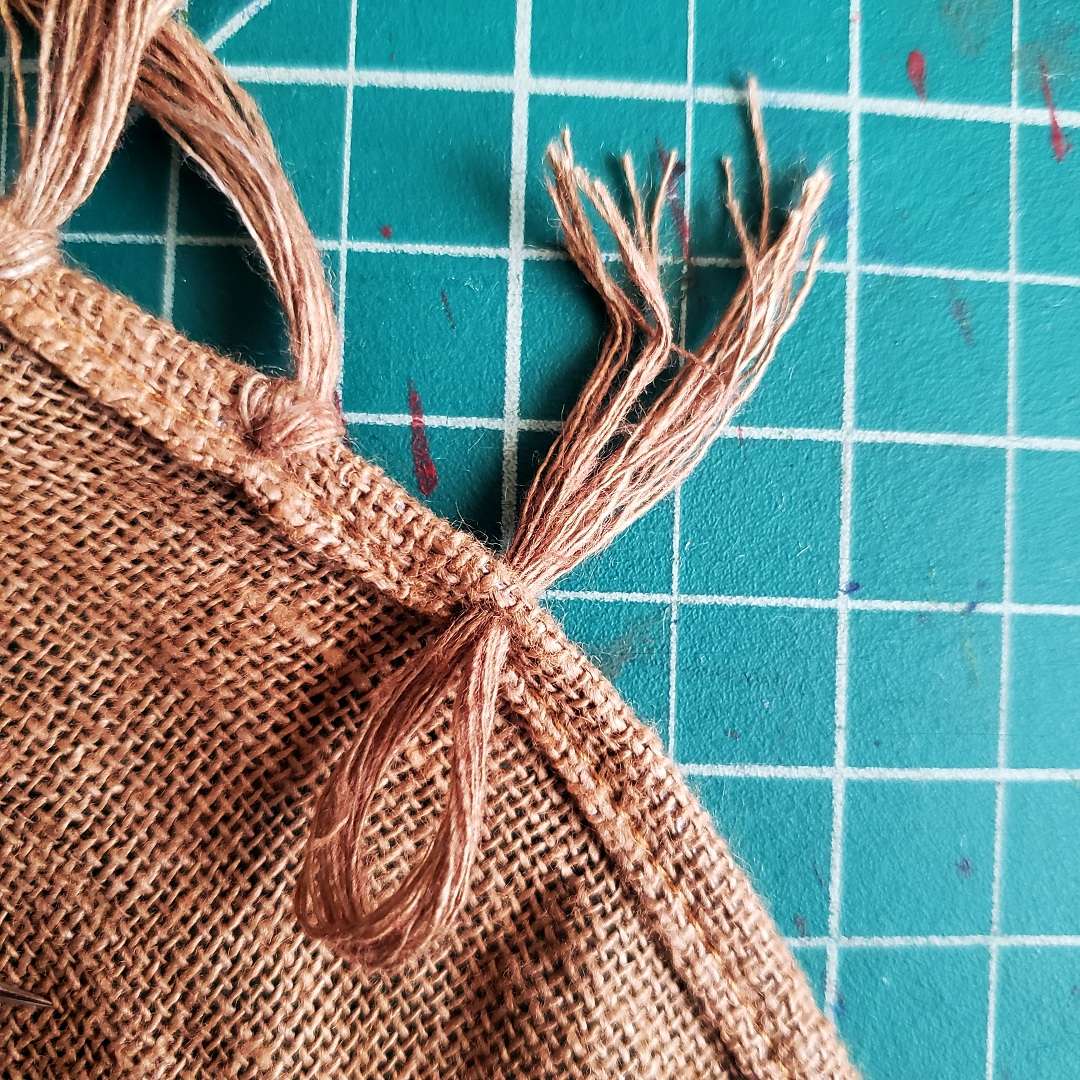


If you do this, you’ll probably want to reinforce your edge with a blanket stitch, a few lines of machine basting, making a turned edge (as I did), or serging/overlocking.
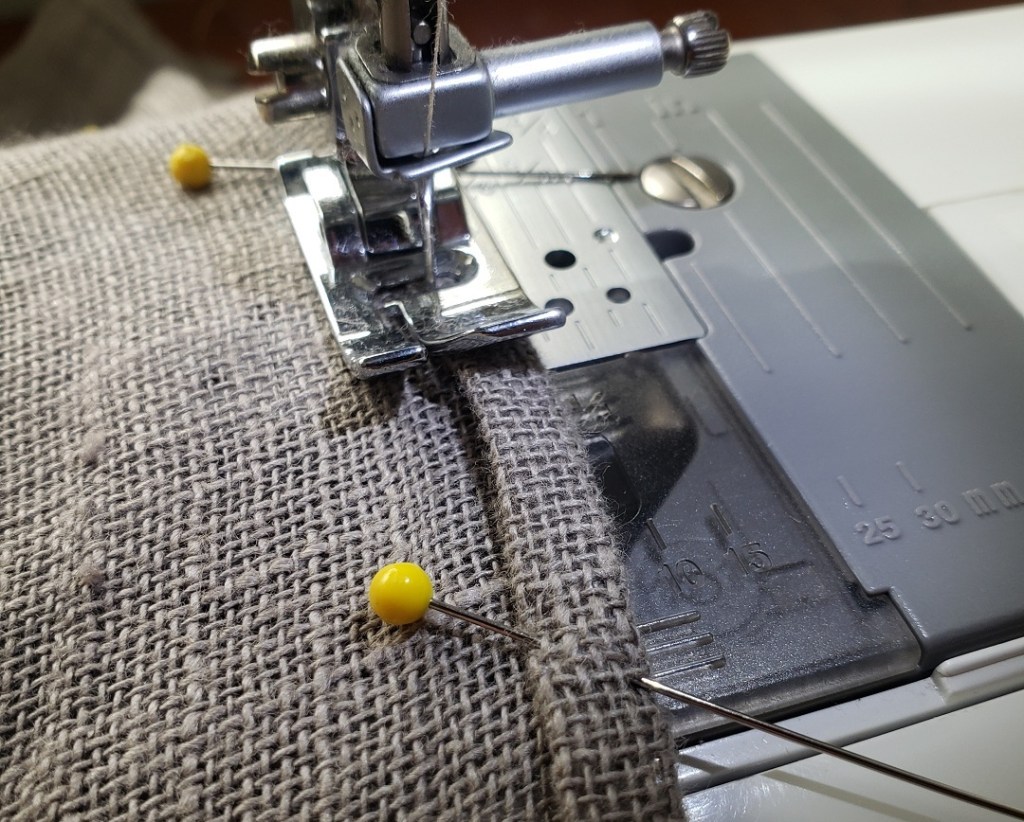
I decided to make one side (opposite the selvedge) of my scarf tasseled via unraveling, so I hemmed the other two sides with a rolled edge. Due to the open weave, I serged these raw edges to give the edge a little bulk and make rolling it easier. With tight-weave fabric, serging probably isn’t necessary.
If you want to dye your new shemagh, you can do that now too. (I dyed my gray material with RIT ‘Marigold’ and an old batch of ‘Autumn Maple’ from the RIT recipe book.)
Anyway, there you go, you’ve made your very own DIY scarf/headwrap. When you’re finished, give it a few wash and dry cycles to further soften the fabric (contributing to the all-important ‘lived-in universe’ look) and/or make your tassels felt together. If you dyed it with something like RIT All-Purpose, wash with like colors only or handwash separately– these dyes tend to bleed slightly in the wash long afterwards. (I once threw a new white dress shirt in with a load of darks (which included a pair of socks I had RIT dyed brown months earlier) and wound up with a faintly pink shirt. Not good.)
Do you have an idea for a future project tutorial? Leave your suggestions in the comments below, or come discuss with us at the SWLH facebook community! See you next time!
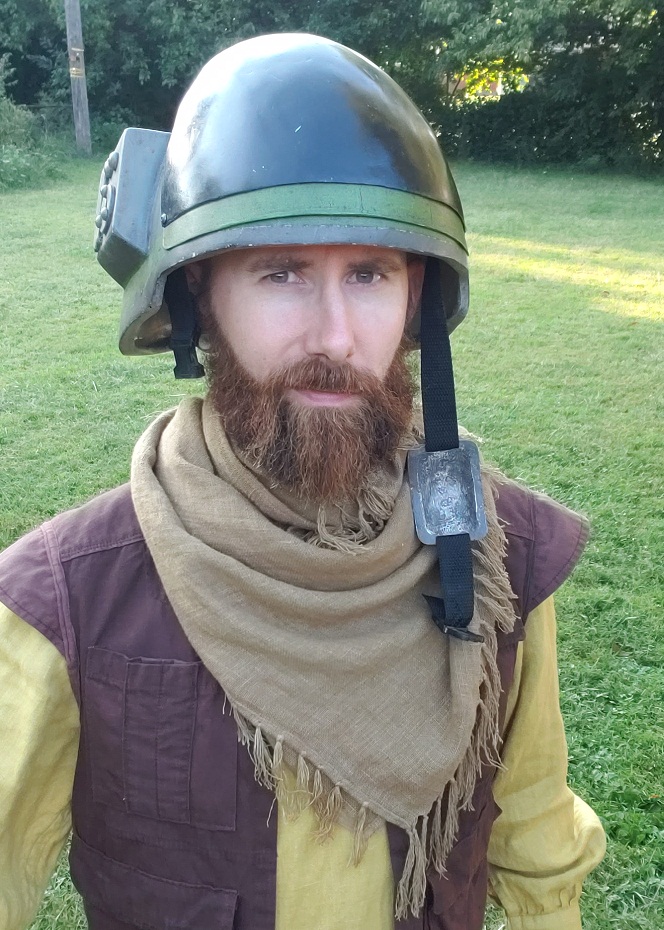
If you’re staring down a deadline and absolutely have to resort to buying a shemagh, a solid-colored one like this is a way better choice than a two-tone one: they’re woven the same way, but since it’s all using the same color you can actually see the waffle textures without the contrast- which gives a much more in-universe look.
Crafting, photographing, and writing this site takes a lot of time and energy. If you’ve enjoyed reading, have learned something from this post, or will use it as a tutorial for your own shemagh, please consider supporting my work with a small donation below! Thank you!
Make a one-time donation
Make a monthly donation
Choose an amount (US dollars only – unfortunately, I cannot currently accept Republic credits 😉
Your contribution is greatly appreciated and will help me continue to keep this blog ad-free!
(Alternately, you can support my work via ko-fi as well.)
Your contribution is greatly appreciated and will help me continue to keep this blog ad-free!
(Alternately, you can support my work via ko-fi as well.)

2 thoughts on “HOW TO: DIY shemagh scarf”