

The pilot build is coming right along, and now we’re in the final stretch: with clothing (aka ‘soft kit’) items out of the way, this time we’re adding on the various accessories that really help sell the snubfighter pilot look! First up is (per the Rogue One visual guide) a “Novaldex Diagnostech life support unit”, aka chestbox!

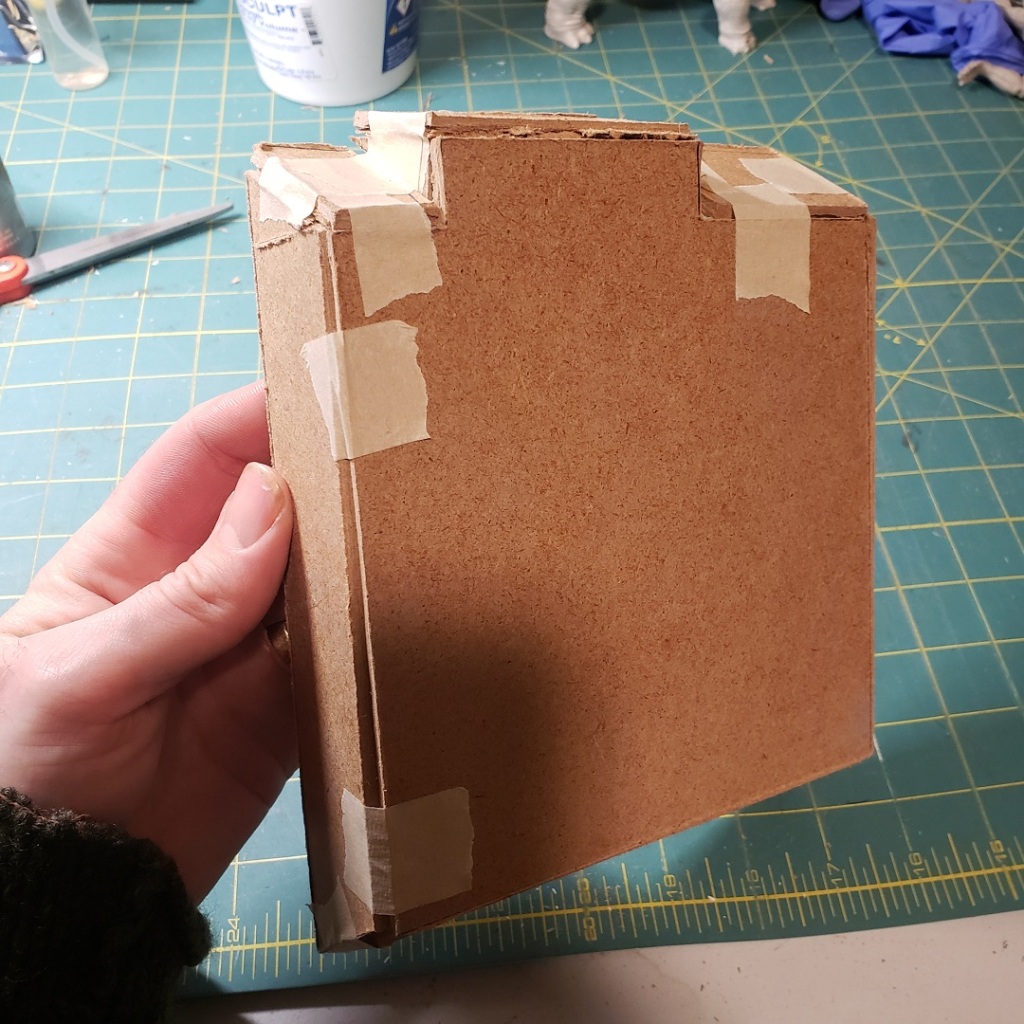
When I started this pilot project, I was still working commission-to-commission, and for a starving artist, shelling out $100+ for a vacformed or 3D printed chestbox was something I wasn’t comfortable doing. Now that I have a more regular source of income, I can see that it’s not that much to pay, but I still wanted to do my part and keep the DIY-craftsman ethic alive. Never one to turn down a good problem-solving challenge, I decided to scratchbuild my own. I knew this element would be the most involved, so I started work on it last August. From a measured diagram I produced a foldable pattern, which I turned into a ‘Mark 1’ pepakura using shoebox cardboard in about a week:


Despite the resin/rondo coatings, it was still too flexible and the sides wouldn’t stay quite square; it simply wasn’t worth the effort it was going to take to make it work, so I decided to cut my losses and start over, thus avoiding the ‘sunk cost fallacy’ (i.e. believing something is worthwhile just because you’ve invested a lot of time or money into it). I was still a little dispirited all the same, so I had to bide my time until the right material appeared. Come early December, I found some small sheets of Masonite for another couple bucks at my local secondhand craft shop and laid out my Pep pattern on these. This time, the material was rigid enough to not flex or require much post-processing.

I originally made a set of rocker switches from some MDF scrap according to measurements I found on the Rebel Legion forums, but these wound up being too chunky. My Mk2 switches were narrower but still too sort, so I wound up grabbing a set from DHPFX, which were the right width and longer (although, to my eyes, the OT switches are still shorter). To add a little bit of ‘middle way’ customization, I made up a Wedge-style middle rocker switch:

The box’s black details were painted on with gloss Vitrail glass paint, while the white stripes are 1/8″ strips of white electrical tape…which I should probably upgrade to some less stretchy actual pinstriping – I’m sure a Cricut machine could easily make cohesive white rectangles that don’t come apart at the corners. The dots on the switches are likewise black electrical tape I stuck to wax paper and then ran through a hole punch! The silver knob and acrylic tiles came from DHPFX, the washer I found in a parking lot, and the chrome snap-looking thing is just a male snap I had kicking around! And of course, a little weathering never hurts!


The chest box’s dishwasher hose (with plenty of extra) came from my local Habitat for Humanity ReStore for $3, it got a coat of the same dark gray paint as I used on the chestbox. The hose elbow was also scratchbuilt, a Frankenstein combo of a 1” PEX test plug with a 90° elbow (~$5? at Home Depot), strengthened with some bamboo and filled with bondo resin for density:


To give a good seal against the flightsuit, I embedded a pair of small hard drive magnets within some black resin around the rim. These stick onto a matching steel washer inside the flightsuit for a tight fit.
With the chestbox finally out of the way, there are still a few more details to add before we’ve got the full loadout. The mini ‘belt flares’ are sections of 3/8” dowel, simply painted silver with acrylic. I got enough for a dozen at the local craft shop for a buck or two. I found that the water-based paint caused the grain to raise, so after the couple coats of paint were dry, I gave them a good burnishing.

The wrist commpad ($10? bought it along with the flightsuit) and matching code cylinders ($10/ea) I already had, but in the interest of pushing the envelope I also snagged one of these cool alternate styles seen worn by Wedge and other pilots in the OT.

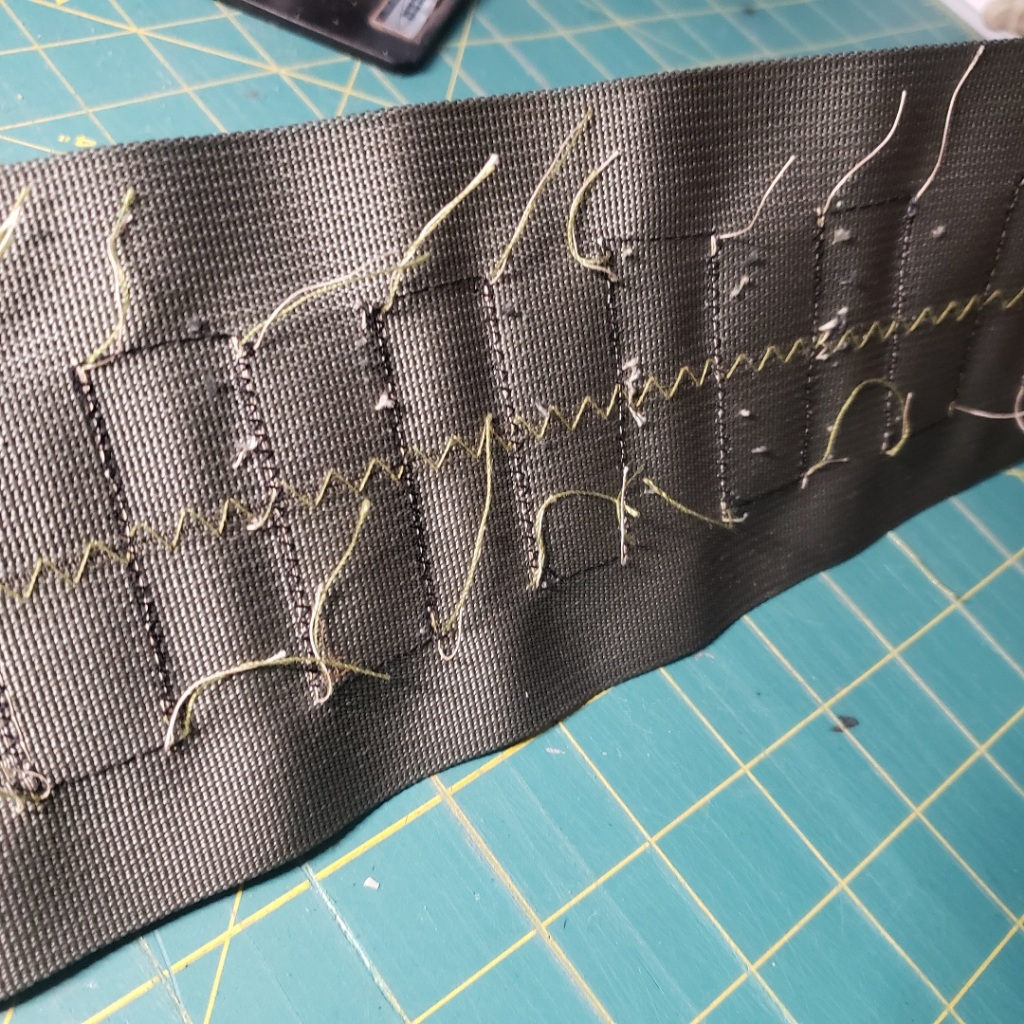
As I think people are coming to realize, one of the keys to effective GFFA design is repeated shapes—whether that be rocker switches, box pleats, ‘blood stripes’, ribbed quilting, or a ring of these ‘boot flares’. Yay, even More loops to sew! These are 2” green webbing (strapworks again, although I think technically the loops are supposed to be made of something more canvas-y), and the flares are .86” wooden dowels (another buck or two from the craft shop). Because I wanted this to also feel like an authentic piece of in-universe milsurp and thus did not want to see all the dangly thread ends every time I put it on, I lined the cuff with some authentic milsurp material – canvas from a Soviet plash-palatka rain cape!

We’re almost there, but it still feels like something’s missing…

That’s it! An iconic pilot is no good without an iconic helmet (in this case, the Koensayr K-22995, apparently), so to top it all off:


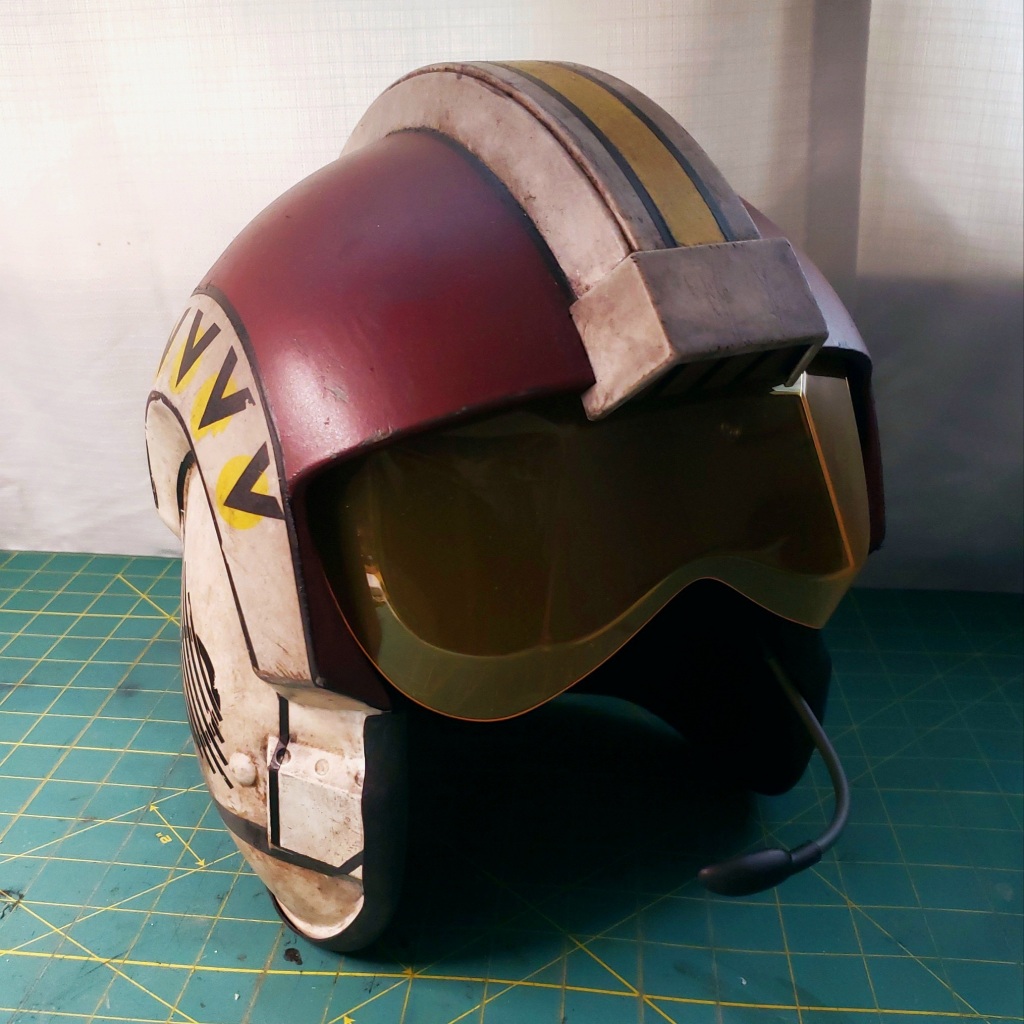
A repainted Wedge Antilles helmet from Hasbro’s ‘black series’ line, found semi-locally on fb marketplace ($90); naturally, I didn’t take any before pictures, but they’re all the same anyway.

I considered tracking down one of those hideous ‘Black Spire Outpost “lebel pilot”’ helmets sold at Disney purely for the righteous satisfaction that would come with sanding off the bad Aurebesh, but I couldn’t pass up the Wedge for essentially the same price and supporting the secondary market instead of the Mouse.
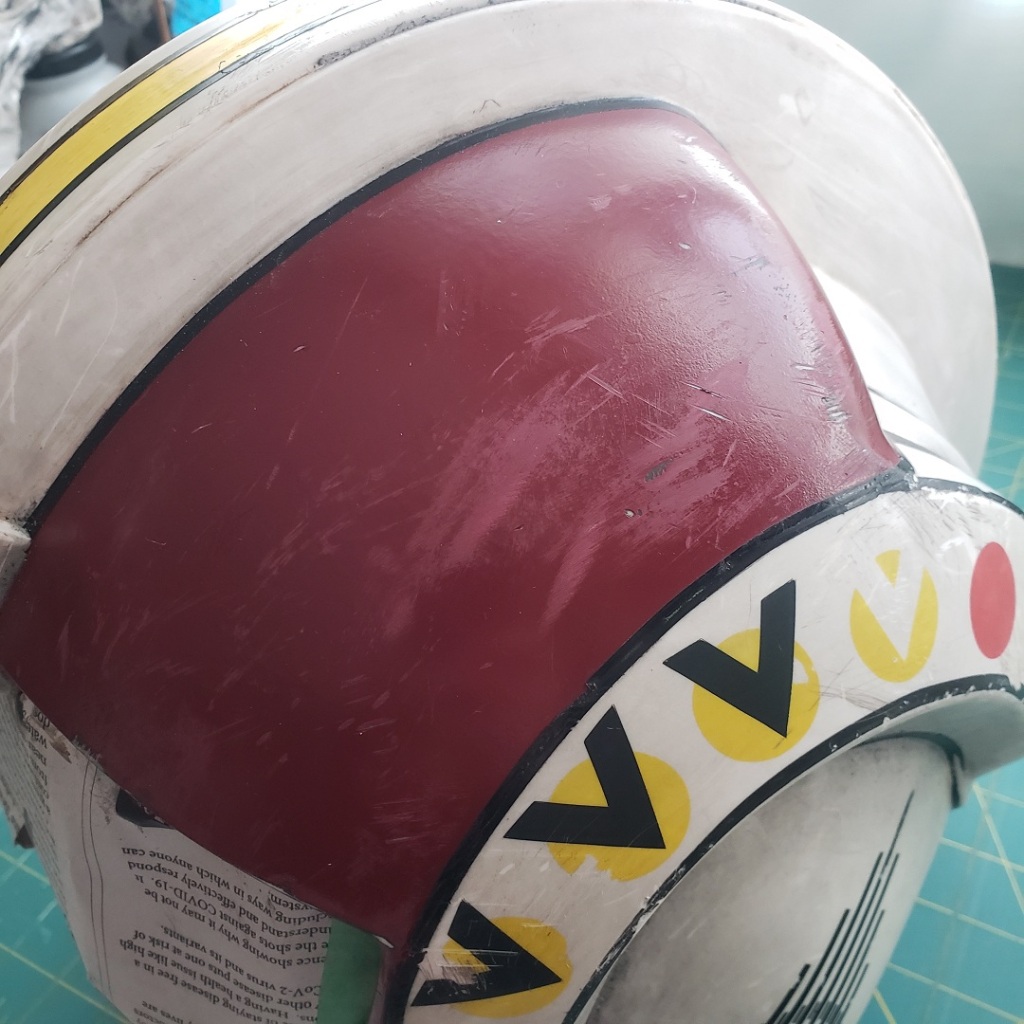
The sound effects-button on the right side was disconnected and puttied in place, and I repainted the green sections with the same Rustoleum ‘Claret red’ I used for my B1 security droid shoulder; this by itself made a huge and instant improvement in changing the overall look of the helmet, but I wanted to do a little more. I didn’t like the glossy black of the underside of the forehead box, so that received a coating of red-brown primer (same as I used on my TK forearms). Then, with 600 and 1500-grit sandpaper, a little water, and some careful elbow grease, I removed both the majority of the airbrushed/screenprinted(?) weathering and the three ‘wing’ details on each side of the ‘mohawk’. I felt that these elements were fairly unique to Wedge, and since the green clashed with the repainted red sections (and I really want to do my best to avoid a Christmas tree look), they had to go.

Next I sanded off the black elements of the mohawk stripe, and went over the yellow with some spraypaint I had that turned out to be essentially the same shade (Krylon sunshine yellow). For another instant upgrade, the Mohawk stripe and the red sections were then outlined with some 1/8” black vinyl pinstriping from the auto parts store ($3 for 40 feet).
All of this got accomplished by the end of 2023, but before I could apply a healthy dose of acrylic weathering to really sell the ragtag Alliance look, a pesky polar vortex hit and pushed any hope of warm-enough-to-spraypaint-and-clearcoat off until early February. In the meantime I abused the bucket in anticipation of weathering day.

Finally, warmer and drier weather arrived, so it was time to add some black- and brownwash weathering before clear coating. (I also added the requisite gray heatshrink tubing to the mic arm.)
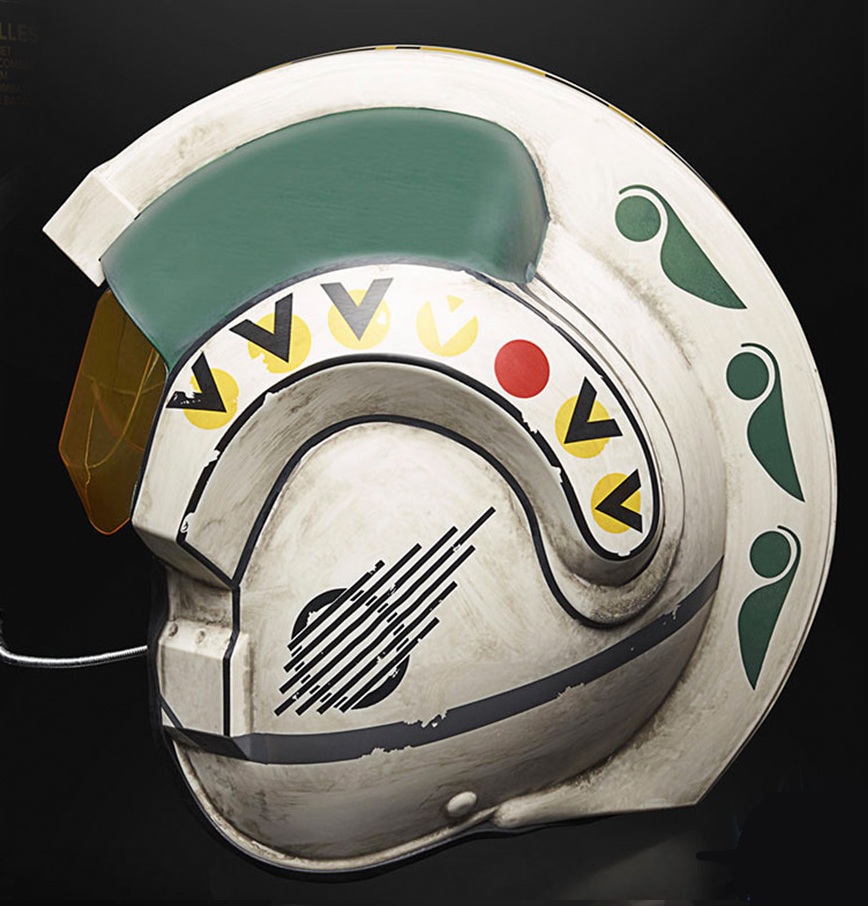
Let’s see how the final look compares to the initial concept art:

All told, not bad! By my reckoning, I’m right around $450 for the whole kit, and over half of that is from things I already had; from what I can tell, had I bought readymade softgoods (and an assemble-it-yourself helmet kit), the total would be somewhere in the neighborhood of $730? Especially compared to something like a screen-accurate Vader or Boba Fett, a Rebel pilot is a fairly inexpensive kit to put together, and I hope that this project shows that there is room for a bit of visual variations within the ranks!

Thanks to my supporters ‘R.S’., A.L., P.D., and R.F. – writing and photographing a breakdown like this takes a lot of time and energy! If you’ve been inspired by this impression or would like to see more pieces like this on the site, please consider supporting my work via ko-fi, or with a small donation below! Thank you!
Make a one-time donation
Make a monthly donation
Choose an amount (US dollars only – unfortunately, I cannot currently accept Republic credits 😉
Your contribution is greatly appreciated and will help me continue to bring you this kind of in-depth material! Alternately, you can support my work via ko-fi as well.
Your contribution is greatly appreciated and will help me continue to bring you this kind of in-depth material! Alternately, you can support my work via ko-fi as well.
DonateDonate monthly