
In our last post, I laid out my plan to push the boundaries of Original Trilogy pilot style in a simple, believable way: take the iconic ANH look and swap the orange flightsuit for a tan one. It may be a minor change, but it’s also an effective one – let’s get started and break it down layer by layer!

The flightsuit in question is my old tan standby from Wampawear – originally purchased for a hypothetical New Republic Archeological Corps shovel bum impression. That may have fizzled out, but the elements I initially gathered for it are as solid as ever. All the weathering you see is 100% honest and natural: every time over the last 4 or 5 years when I’ve had to work on my car (oil changes, brakes, pushing out dents, lug stud swaps, etc.) I’ve worn this flightsuit, and in the process have built up a really impressive pattern of real wear in authentic places. In person it’s absolutely filthy looking, but on camera it just reads as extra well-used. I hesitate to wash it because I’m so pleased with the patina but I’m also aware that doing so would probably be good for the garment. If I do, it will likely just be handwashed with little (if any) detergent.
(Boots are Finnish military jackboots I snagged from Varusteleka years ago.)
From the beginning, the ejection harness was one component I really wanted to do in as authentic or realistic a manner as possible. While it’s an obvious stylistic homage to the parachute harnesses of WW2, it doesn’t quite make much sense—there’s just not that much to it, comparably. Apparently, Rebel Legion folks just safety pin or Velcro the naked top end of their harness webbing to the flak vest or flight suit, which I find completely un-immersive! I wanted this to really feel like a piece of in-universe military gear – one I wouldn’t be afraid to be seen suiting up in – so I came up with a simple over-the-shoulder design that would still remain unseen under the shoulders of the flak vest.


Because I was using a light-colored flightsuit, I wanted to try and create a little more contrast with the webbing, so I dunked the whole harness (plus my belts) in walnut stain to darken it just a touch:

As I described previously, my flak vest was a $40 piece from Amazon that I retooled for improved accuracy. I also upgraded to some slightly more screen-accurate clips at a much more affordable price point.

I actually made two belts for this kit, one plain ANH style and one more detailed ‘Rogue One’-style. For some reason in RAII, most of the pilots wear OT-style belts that are dark khaki, not silver. I wonder if these were from the Archives as well – perhaps originally worn by Yavin technicians?


The OT belt is simply 2” silver nylon webbing, with ‘flare loops’ made from 1” webbing. A British roll-pin buckle from eBay completes the look.
The PLCE belt was a different matter; when it arrived it was closed with a massive 2” side-release buckle that was immediately removed:


The design of these things is very clever – the sections that create the ribbed effect are normally to the inside and hold the prongs of the free end’s hook. The belt itself is actually two layers—the thicker ribbed layer and a thinner flat layer; thankfully, the ribs are created through some magical weaving process such that separating the two layers doesn’t cause the ribs to disappear.
The added ‘flare loops’ are actually scraps of the same 1” silver webbing I used on the OT belt, after some time in a dyebath of RIT Tan. To make everything match better, I dunked the belt itself in my black walnut stain to tone down the shininess and darken it a shade.


To protect one’s hands from the ostensible rigors of being a flyboy, a pair of sturdy gauntlets are needed. Sure, I could have snagged a premade pair from an online shop, but I will almost always opt to save my money and pay instead in time/effort, with the added satisfaction of being able to say, “I made this!”.
Plus, in this case, I’d been gifted two lovely deerskins from my best friend’s family, and (as Jon was a ‘orthodox’ OT-and-EU fan to the day he died), I wanted to repay the gift by using some of the leather in this kit in his honor. To this end, I found some reasonable deerskin gloves on Amazon, then added the cuffs. Of course, this was a multi-step process! I had to draft a pattern, lay and cut out the pieces, dye the leather, oil the leather, and mark the holes before stitching everything together.
To better match the way the screen-used gloves were constructed, I first decided to resew the index finger’s outer seam (the only one using an overlapping seam and not sewn ‘right sides together’), using a backstitch.

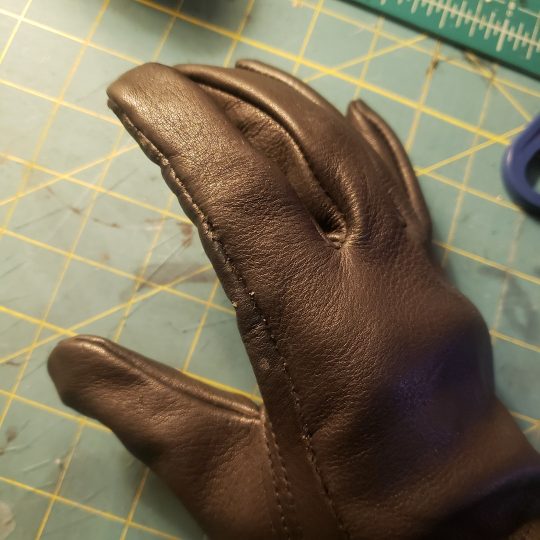
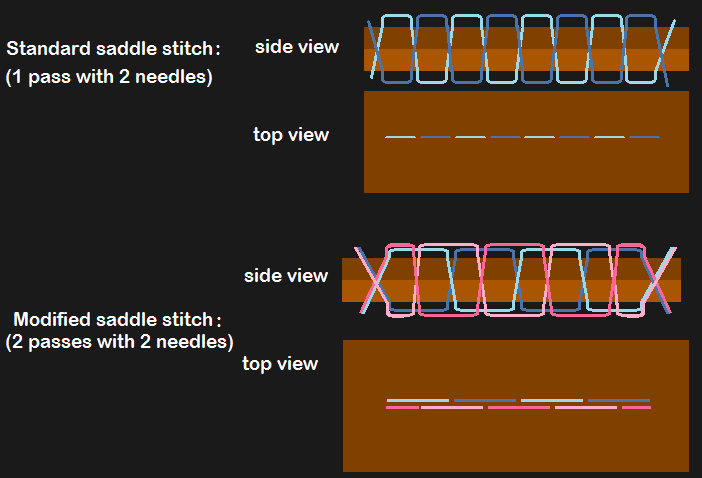
When it came time to sew the cuffs onto the gloves themselves, I ran into an issue. I use a 6 teeth-per-inch wheel to mark my holes, but I didn’t want to pre-stab every single one with my awl before sewing (which would open up the possibility of the leather stretching and the holes becoming misaligned). Therefore, I decided to glue the seams together (using E6000) and then used a modified saddle stitch using every-other hole. From the outside, the end result is the same tightly-sewn seam, but it was actually done in two passes, using a longer stitch length which worked out very well.
To give the gauntlets a more finished look, I went ahead and sewed the outer edge as well – the rolled and stitched leather is so much classier than simply a raw leather edge!

Lastly, a pass of black shoe polish on the cuffs served to give them a bit of shine and better match the deep black deerskin of the gloves. Overall, I am very pleased with how the gauntlets turned out – but I’m also very glad I won’t have to make another pair!
There is one more piece of mostly-soft kit I want to add to this pilot impression, but as it’s completely superfluous it can wait for later…plus I ran into a big headache after I got it put together (darn twill fabrics!) and have to figure out how to fix it first!
So, with soft kit only, here’s what we have: it’s definitely clear what I’m going for, but we’re not there yet. Stick around, though – up next: hard kit!

Thanks to my supporters ‘R.S’., A.L., P.D., and R.F. – writing and photographing a breakdown like this takes a lot of time and energy! If you’ve been inspired by this post or would like to see more pieces like this from me, please consider supporting my work via ko-fi, or with a small donation below! Thank you!
Make a one-time donation
Make a monthly donation
Choose an amount (US dollars only – unfortunately, I cannot currently accept Republic credits 😉
Your contribution is greatly appreciated and will help me continue to bring you this kind of in-depth material! Alternately, you can support my work via ko-fi as well.
Your contribution is greatly appreciated and will help me continue to bring you this kind of in-depth material! Alternately, you can support my work via ko-fi as well.
DonateDonate monthly