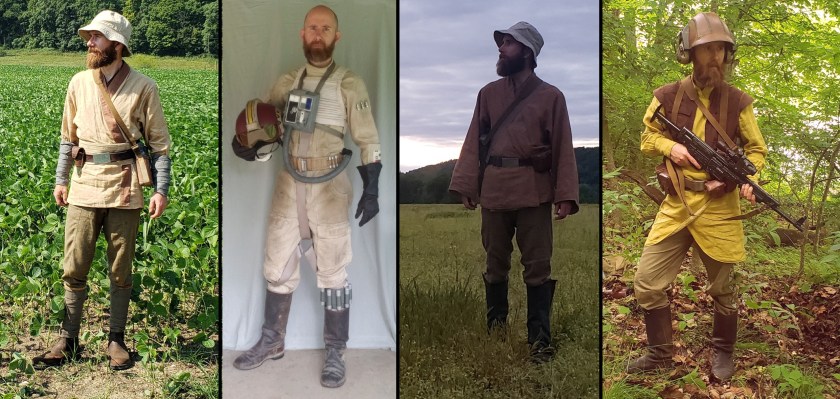
SOMEHOW, it’s rapidly approaching a decadesince I first entertained the idea of using the Galaxy Far, Far Away as a setting for first-person ‘reenacting’, and because progressive reenacting involves constant tinkering and improvement, a fair amount of these various personas has changed since their creation. (Of course, I’m a perfectionist who likes to wait until something is ‘finished’ before sharing – hence why I rarely share full-kit updates! – see the problem here?) Though I haven’t had the time, energy, or opportunities to do anything with them in much-too-long, while I am making incremental progress towards my ‘functional workshop and sewing space’ goals, I wanted to use this Spring to overcome inertia, get some pieces out of my drafts folder, and check in with the state of my galactic impressions!
To accomplish this, I’ve been detailing each of these in their most up-to-date form, as well as summarizing the background research and justifications for choices that I’ve made to create each impression – all intended to serve as an example of what solid, research-based, fictional living history can look like.
Instead of publishing these as Posts (which will inevitably get pushed down the site’s front page), these breakdowns can now be found collected at the more permanent Personas and Impressions page ^above^! Check them out, and let me know your thoughts!
While the new-home renovations continue, I am still at least a month from having a functional crafting studio or workshop again, and so in the interest of avoiding a lull and having to overcome the inertia to resume publishing (and to get some pieces out of my drafts!), I thought this would be a good time to check in with the state of some of my galactic impressions. Links to each of these breakdowns will all be collected at the Personas and Impressions page ^above^!
Seeing as how I’ve continued to rework this impression in the years since its ‘first draft’, I want to show how things have progressed, and also serve as a benchmark for any changes I make in the future. Since Naboo pretty much drops off the galactic stage after about 18 BBY, this impression required a large amount of ‘frog DNA’ to extrapolate and create a complete kit from a specific time and place. However, as I hope will become clear, this method of taking the truth of my own life and ‘translating’ it to an in-universe context works very well for creating a fleshed-out but believable persona that stays within the bounds of the setting. (Numbers in [brackets] refer to reference sources in end notes.)
The pilot build is coming right along, and now we’re in the final stretch: with clothing (aka ‘soft kit’) items out of the way, this time we’re adding on the various accessories that really help sell the snubfighter pilot look! First up is (per the Rogue One visual guide) a “Novaldex Diagnostech life support unit”, aka chestbox!
When I started this pilot project, I was still working commission-to-commission, and for a starving artist, shelling out $100+ for a vacformed or 3D printed chestbox was something I wasn’t comfortable doing. Now that I have a more regular source of income, I can see that it’s not that much to pay, but I still wanted to do my part and keep the DIY-craftsman ethic alive. Never one to turn down a good problem-solving challenge, I decided to scratchbuild my own. I knew this element would be the most involved, so I started work on it last August. From a measured diagram I produced a foldable pattern, which I turned into a ‘Mark 1’ pepakura using shoebox cardboard in about a week:
It might not look like it, but this thing is noticeably warped/skewed and far from square.
Despite the resin/rondo coatings, it was still too flexible and the sides wouldn’t stay quite square; it simply wasn’t worth the effort it was going to take to make it work, so I decided to cut my losses and start over, thus avoiding the ‘sunk cost fallacy’ (i.e. believing something is worthwhile just because you’ve invested a lot of time or money into it). I was still a little dispirited all the same, so I had to bide my time until the right material appeared. Come early December, I found some small sheets of Masonite for another couple bucks at my local secondhand craft shop and laid out my Pep pattern on these. This time, the material was rigid enough to not flex or require much post-processing.
In our last post, I laid out my plan to push the boundaries of Original Trilogy pilot style in a simple, believable way: take the iconic ANH look and swap the orange flightsuit for a tan one. It may be a minor change, but it’s also an effective one – let’s get started and break it down layer by layer!
The flightsuit in question is my old tan standby from Wampawear – originally purchased for a hypothetical New Republic Archeological Corps shovel bum impression. That may have fizzled out, but the elements I initially gathered for it are as solid as ever. All the weathering you see is 100% honest and natural: every time over the last 4 or 5 years when I’ve had to work on my car (oil changes, brakes, pushing out dents, lug stud swaps, etc.) I’ve worn this flightsuit, and in the process have built up a really impressive pattern of real wear in authentic places. In person it’s absolutely filthy looking, but on camera it just reads as extra well-used. I hesitate to wash it because I’m so pleased with the patina but I’m also aware that doing so would probably be good for the garment. If I do, it will likely just be handwashed with little (if any) detergent. (Boots are Finnish military jackboots I snagged from Varusteleka years ago.)
From the beginning, the ejection harness was one component I really wanted to do in as authentic or realistic a manner as possible. While it’s an obvious stylistic homage to the parachute harnesses of WW2, it doesn’t quite make much sense—there’s just not that much to it, comparably. Apparently, Rebel Legion folks just safety pin or Velcro the naked top end of their harness webbing to the flak vest or flight suit, which I find completely un-immersive! I wanted this to really feel like a piece of in-universe military gear – one I wouldn’t be afraid to be seen suiting up in – so I came up with a simple over-the-shoulder design that would still remain unseen under the shoulders of the flak vest.
It may certainly have been a while since I had a new kit built to break down, but I think I finally picked a real winner with this one! As I mentioned recently, I’d apparently been toying with the idea of assembling a proper Rebel Alliance Pilot kit for a while now: at the end of last April it was an idle fancy, by May, I was highly considering it, and by the end of June I had actively started pricing and sourcing the components!
When I was first entertaining the idea, I experienced a funny, unfamiliar feeling. I’ve become SO used to having to doactual research/work—decide on a home planet, find references to extrapolate the local style, draft patterns, create garments, etc.—for my typical ‘Original Character’ impression/persona that an Alliance pilot (made up of specific elements without much room for customization) feels like just a series of boxes to check off. However, I figured I had already acquired three of the biggest elements (flightsuit, boots, and vest) over the years for use in other kits (because they’re no-nonsense, commonly-seen-in-universe pieces that naturally lend themselves to mix-and-matching!), so why not take the next step and create a kit that would actually be recognizable to John Q Public with minimal explanation? Plus, since opportunities for doing SW living history continue to be pretty much non-existent in my sector, a pilot outfit might actually finally allow me to join up with the Rebel Legion – because none of my previous kits1 quite jive with their current model!
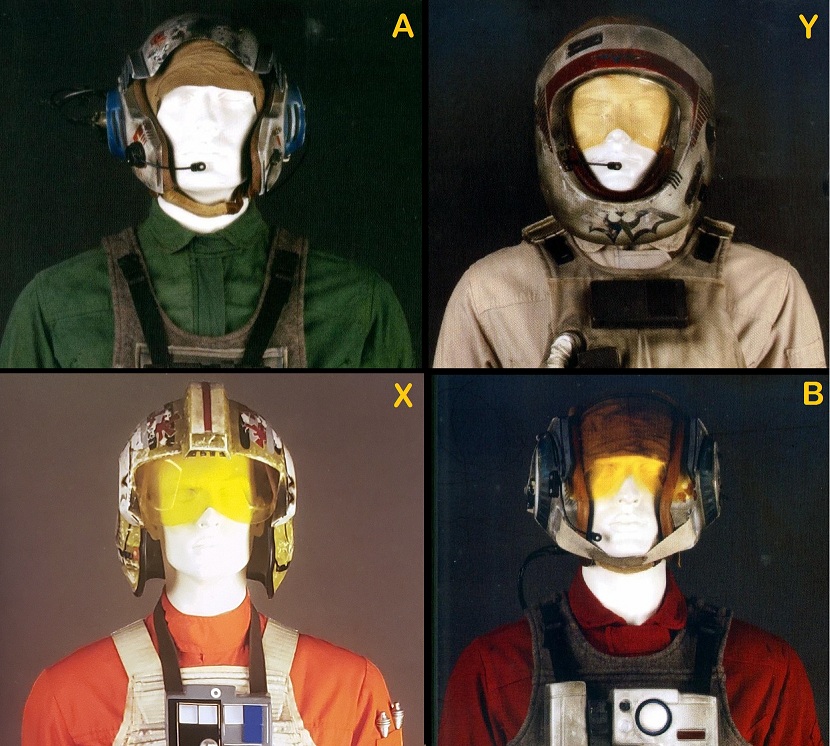
Usually, whenever I see someone online who has put together a ‘custom pilot’ costume, it’s been prefaced by some variation of “I put my own spin on it!” and leans more on the OC’s go-to “wouldn’t it be cool if ___?”…. and thus the final result rarely ‘reads’ as “pilot”. As should be clear by now, I have a really hard time going along with the crowd; however, as I hope I’ve also made clear, I believe a valid ‘middle way’ exists between the two extremes of the dogmatic “on-screen assemblages only!” Legion, and more casual, “anything goes, let your imagination run wild!”-type cosplay. I don’t know how many hundred OT-era pilot cosplayers there are out there (easily 95% of these are X-wings), but I’ve yet to see one that didn’t follow these same old onscreen combinations of flightsuit color and helmet style:
As someone really interested in the early Rebellion period, I think switching things up to be a little less uniform helps underline the ‘ragtag’ nature of the Alliance. I’m sure there had to be pilots who joined up and brought their own personal flightsuits with them – I definitely remember some climate ‘direct actions’ where we street medics were literally told, “Sorry we don’t have any supplies for you, you’ll have to requisition your own or use what you have” and can easily imagine similar situations in the pilots’ ranks. Obviously, I can’t resist pushing the boundaries of OT-era pilot style at least a little bit, but I’m not going to go so far outside the bounds that I no longer look like an OT-era pilot! (Now there’s a nice summary of the ‘middle way’ approach for you: do your research, push the boundaries, but stay within the guardrails!) Luckily for me, I don’t have to feel like I’m sticking my neck out too far because an often-overlooked EU source did it first!
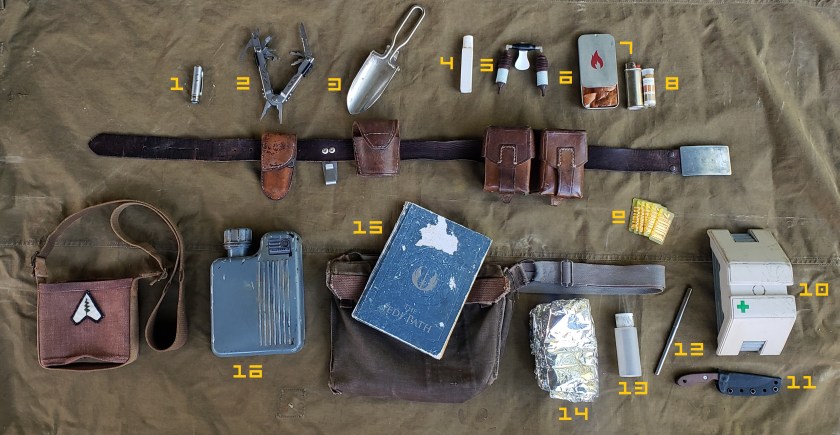
This month, I’m switching things up and making an effort to lay out my current complete kits for GFFA reenacting/living history. The clothes (soft kit) worn by a Jedi in the AgriCorps are only one part of that impression – what about field gear???
“What do the Jedi carry in their pockets? String, or nothing! In The Phantom Menace we see that the Jedi wear utility belts, and just as Batman always has the right tool for the job the Jedi would therefore carry anything the writer needed them to have in a particular story, up to and including space-shark repellent. … The Jedi would never be caught without a breather, a comlink, food capsules, etc.” (Dan Wallace, endnotes for The Jedi Path, #3 of 4)
The basic needs can be covered by a belt kit which holds the necessary tools, a canteen for hydration, and a satchel (M9A1) for a couple larger items.
Somehow, it’s been almost seven years since I first entertained the idea of doing first-person interpretive workshops in the Star Wars setting, and since then my various portrayals have evolved quite a lot! Although a reenacting kit is never ‘finished’—but I’m a perfectionist who likes to wait until something is complete before sharing (hence why I rarely share full-kit updates! – see the problem here?)—I want to try and lay out each of my ‘complete kits’ in their most up-to-date form, summarizing the background research and justifications for choices that I’ve made to create each impression. All of this is intended to serve as an example of what solid, research-based fictional living history looks like. Because they will inevitably get pushed down the blog’s front page, these posts will be collected at the new PERSONAS AND IMPRESSIONS page ^above^!
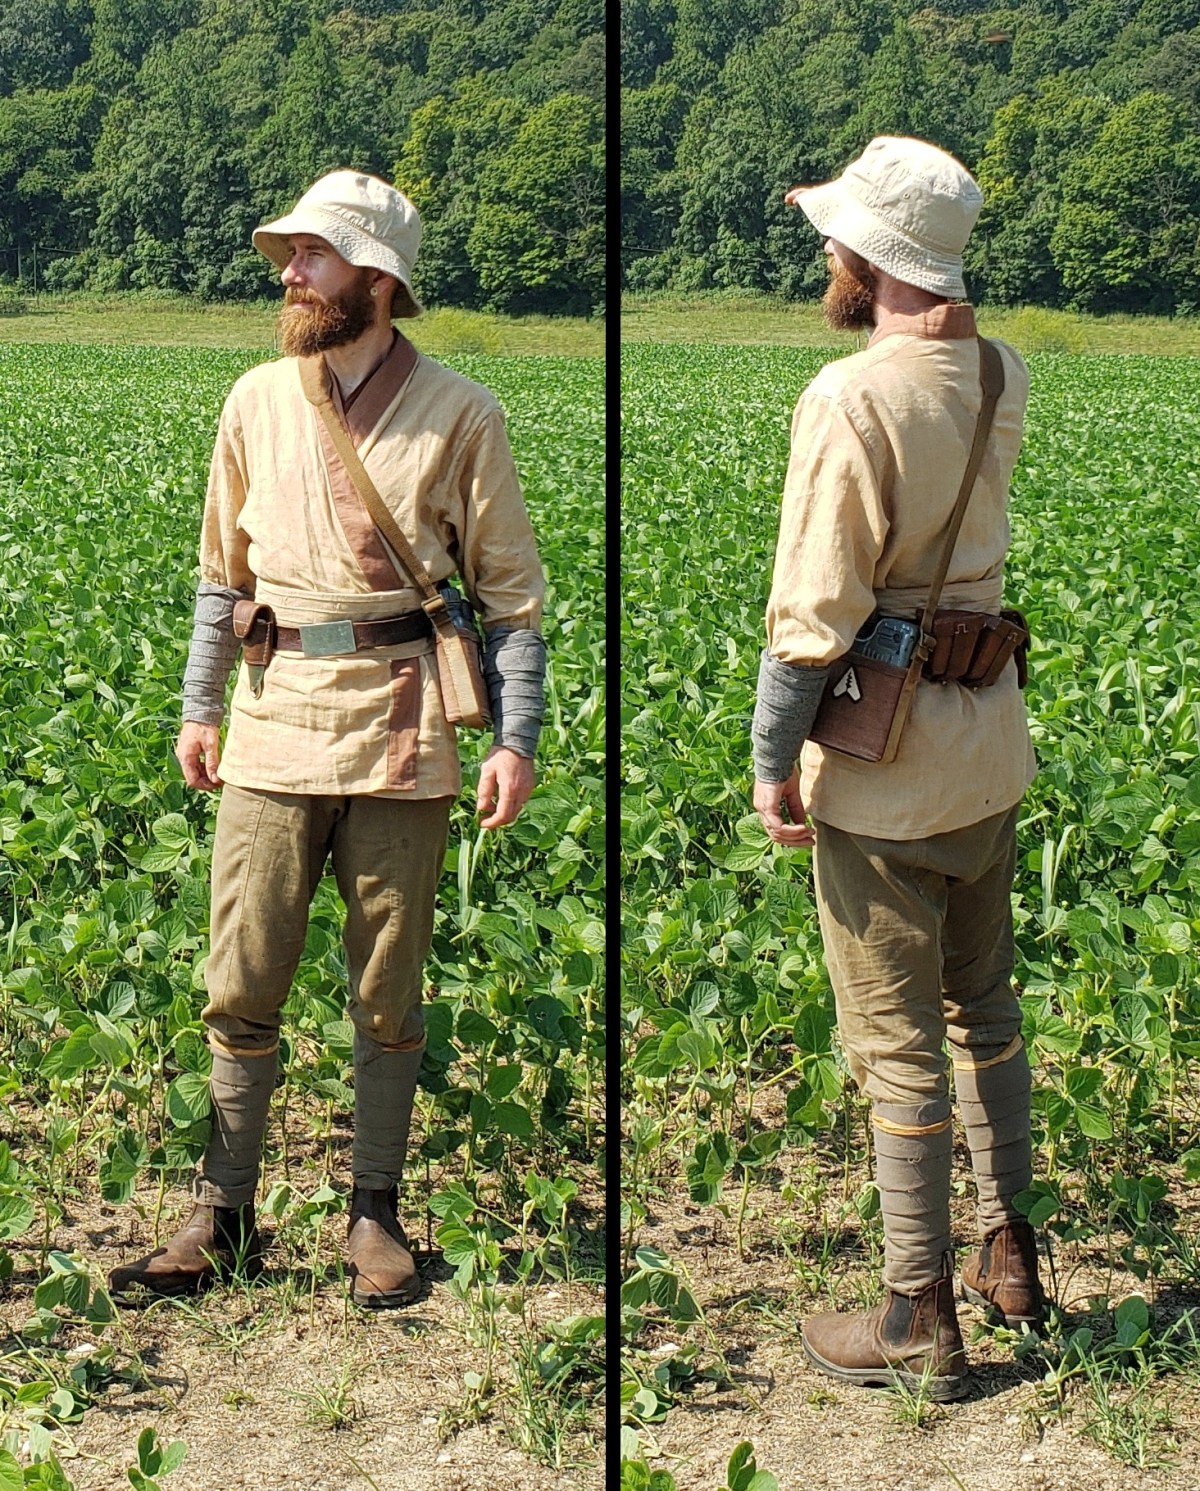
I want to start with the impression that first got me thinking about ‘doing Star Wars‘ in a reenacting/living history sense – a ‘washout Jedi’ member of the Agricultural Service Corps.
As the name of the game in rigorous reenacting is ‘continual improvement’, I’m always on the lookout for things to help add some depth or otherwise level-up my impressions. While Rebel characters typically steer away from the plastoid armor side of things, I realized that the ribbed vests worn by various characters were probably meant to protect the vital organs and so would be perfect for a partisan persona as well!
A few months ago, my buddy Anders (of DT Blasterworks) sent me a link to a lower-priced rebel pilot-style flak vest he was thinking about buying. Since my initial impetus for building a SectorForces partisan/guerilla kit was to pair Alliance-issued materiel with local planetary style, I had initially considered including one of these vests. The only one I had looked into was produced by Wampa Wear; at $125, while it’s probably—if anything like their flightsuits—extremely well-made and screen-accurate, I couldn’t justify paying that much for a purely costume piece…so the idea returned to the back burner.
However, Anders’ link (and his report that it was decent quality) renewed my interest, so at about 1/3rd the price of a Wampa Wear vest, I pulled the trigger. Out of the package, I could tell the vest fell in the category of “close enough”, about which I’ve written before: presumably, there are variations on the flak vest throughout the galaxy, and they’re not all produced identically. All the same, I still wanted to try my hand at ‘accuratizing’ the cheapo vest to see if I couldn’t get it a little closer to Alliance specs, as a few things stood out to me that could use tweaking:
The to-do list: -fix the diameter and spacing of the sewn channels -bind the curved edges with twill tape -replace the rear buckle -replace the large side clasps (down the line)continue reading
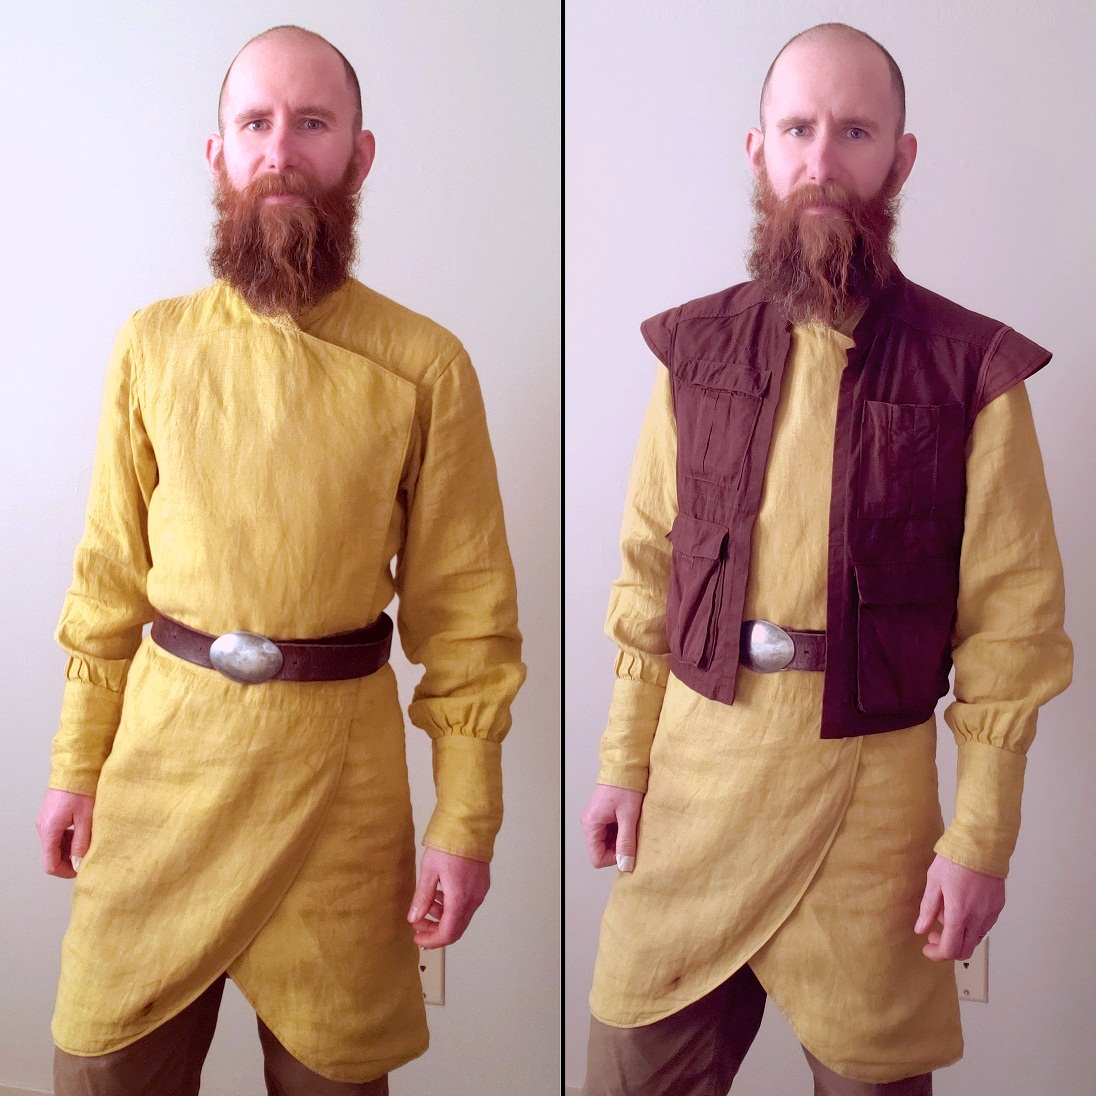
Since debuting my first draft Rebel-partizan-on-Naboo impression back in 2018, further research has caused me to continue to refine the kit. In addition to needing some more layering, the main thing that needed upgrading was the shirt. My ‘Mark I’ Naboo shirt was not (aside from the Mandarin collar and the color) based on any specific onscreen examples, and the use of a Vietnamese ao dai pattern was only inspired by costume designer Trisha Biggar’s comments re: the general use of Asian elements in Naboo fashion (and at the time I liked the asymmetry of the design). However, I realized that I should probably wear something that more clearly ‘read’ as Naboo in origin, and it should probably be constructed of a lighter material as well – the Mk I was sewn from a ‘rustic’ 7.1-ounce linen. Since this piece is intended for a Galactic Civil War era persona, I really wanted to try and move away from the traditional Naboo style seen in the Prequels, especially the Renaissance-heavy designs of 32 BBY:
“We had designed Naboo more or less around Art Nouveau (we called it “Space Nouveau”), which was based on organic, plantlike forms. The costume ideas looked gorgeous on the women, but when you put guys in them, they didn’t look very tough.” – Ian McCaig, Dressing A Galaxy, p.72.
Roughly inspired by the lines of the traditional Indian kameez, I pored over my reference library to see what Naboo male fashion stuck around through the years while noticing any common elements:
Welcome back! This is the third and final part of my buildlog for attempting to scratchbuild an N1 starfighter pilot’s helmet. When we left off, I had the scaling figured out and patterns drafted, and the side pieces and earmuff details created. Now it’s time to craft the helmet’s shell itself. To get an idea of how the helmet would look, I transferred the patterns to lightweight cardboard and taped everything together to make a rough mockup of the whole assembly to check the general shape:
This was bonded along the seams (inside and outside) with brown paper bag and PVA glue (left) before brushing both exterior and interior with Bondo resin (center):