
As the name of the game in rigorous reenacting is ‘continual improvement’, I’m always on the lookout for things to help add some depth or otherwise level-up my impressions. While Rebel characters typically steer away from the plastoid armor side of things, I realized that the ribbed vests worn by various characters were probably meant to protect the vital organs and so would be perfect for a partisan persona as well!

A few months ago, my buddy Anders (of DT Blasterworks) sent me a link to a lower-priced rebel pilot-style flak vest he was thinking about buying. Since my initial impetus for building a SectorForces partisan/guerilla kit was to pair Alliance-issued materiel with local planetary style, I had initially considered including one of these vests. The only one I had looked into was produced by Wampa Wear; at $125, while it’s probably—if anything like their flightsuits—extremely well-made and screen-accurate, I couldn’t justify paying that much for a purely costume piece…so the idea returned to the back burner.
However, Anders’ link (and his report that it was decent quality) renewed my interest, so at about 1/3rd the price of a Wampa Wear vest, I pulled the trigger. Out of the package, I could tell the vest fell in the category of “close enough”, about which I’ve written before: presumably, there are variations on the flak vest throughout the galaxy, and they’re not all produced identically. All the same, I still wanted to try my hand at ‘accuratizing’ the cheapo vest to see if I couldn’t get it a little closer to Alliance specs, as a few things stood out to me that could use tweaking:

-fix the diameter and spacing of the sewn channels
-bind the curved edges with twill tape
-replace the rear buckle
-replace the large side clasps (down the line)
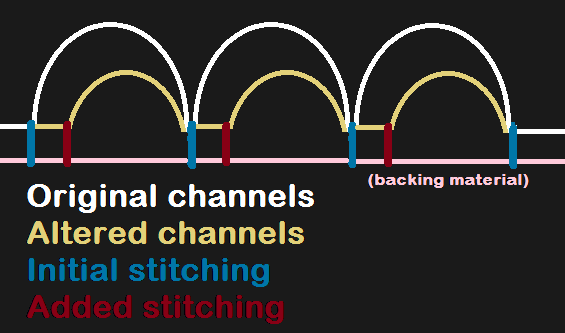
The main issue I noticed was that the channels were too large, and with a stiffening rib inserted each would have touched its neighbor; they came sewn to accommodate a rib of 3/8-½”—which presents a very different look compared to the ¼” tubes of the onscreen vests (which are more spread out). To remedy this, I first wielded my mighty seam ripper along the curved edges, and the bottom three edges to detach the lining. I then added a line of stitching ¼” from the original stitching, which created the needed gap between each channel while making them smaller diameter:
This got things much closer to onscreen style without having to sew them from scratch, which would have been counterproductive and very bad for my mental health; after spending several days this summer sewing a fully-boned 18th century stomacher for my wife, I have learned that when making parallel channels like these, it is far preferable to simply follow an existing line!
With the channels reworked, it was a pretty straightforward task to sew up the three lower edges, turn them right side out again, redo the edge-stiching, and add twill binding to the curved edges. I also replaced the rear adjustment straps (which were a bit flimsy) with the more robust 1” twill tape I used to bind the edges. Upgrading the white plastic adjuster was a stroke of luck, as I had an appropriate buckle (originally part of some Vietnam-era load-bearing straps I cannibalized into backpack padding) stashed away in a box of goodies! (Somewhere in here I cut and installed the stiffening ribs, using 15+ feet of .25” OD polyethelene tubing ($2.53). With all the retooling finished, I tried the vest on again…and realized something was still off:


The fit was all wrong! – the blasted thing was sitting wayyy too low! SO…I got out the ol’ seam ripper again, took the shoulder straps off the back panel, chopped SIX inches off, and reinstalled. This time, much better fit:

Since the vest is made of 100% cotton canvas I knew it would take dye well, so with all the retooling finished (for real this time!), I gave it a dunk in some strong black tea (4 bags) to tone down the like-new shine, bring out some character, and provide a good foundation for some honest guerilla weathering. What do you think?

Between crafting, photographing, and writing, this site can take a lot of time and energy. If you’ve enjoyed reading, or will use this post as inspiration for your own outfit, please consider supporting my work with a small donation below! Thank you! (Alternately, you can support my work via ko-fi as well.)
Make a one-time donation
Make a monthly donation
Choose an amount (US dollars only – unfortunately, I cannot currently accept Republic credits 😉
Your contribution is greatly appreciated and will help me focus on creating more galactic living-history content!
Your contribution is greatly appreciated and will help me focus on creating more galactic living-history content!
DonateDonate monthly
One thought on “Upgrading the Rebel persona: flak vest”