
Before we get started, a quick scheduling note: the project that follows was a long and involved process, involving many different skillsets (including—but not limited to—pattern drafting, sculpting, casting, and woodcarving). Instead of trying to cram all that into one mega post, I’ve decided to split it up into three parts, and rather than dole them out separately across most of this month, I’ll be posting all three today (we’ll return to regular programming next week). With all that out of the way, let’s get started!
With little else to occupy my time while backpacking thousands of miles last year, I spent a large part of my AT thruhike thinking about ways I could improve my various Star Wars reenacting/living history kits when I got back home. Along the lines of adding a Q2 holdout blaster to my Rebel-on-Naboo impression, I wondered if there was anything else I could do to help anchor my kit to that specific planet. While the popular conception of Naboo is of a peaceful, pacifist culture, that’s not exactly the case. While they may not have a proper standing army, the Royal Naboo Security Forces are plenty prominent in the pre-Imperial period and have plenty of hardware to incorporate into a kit. Just as Earth military gear of past generations can trickle down to the civilian market as surplus and family heirlooms lay forgotten in attics, I figured something similar could happen on Naboo as well, especially following their effective demilitarization under the New Order.
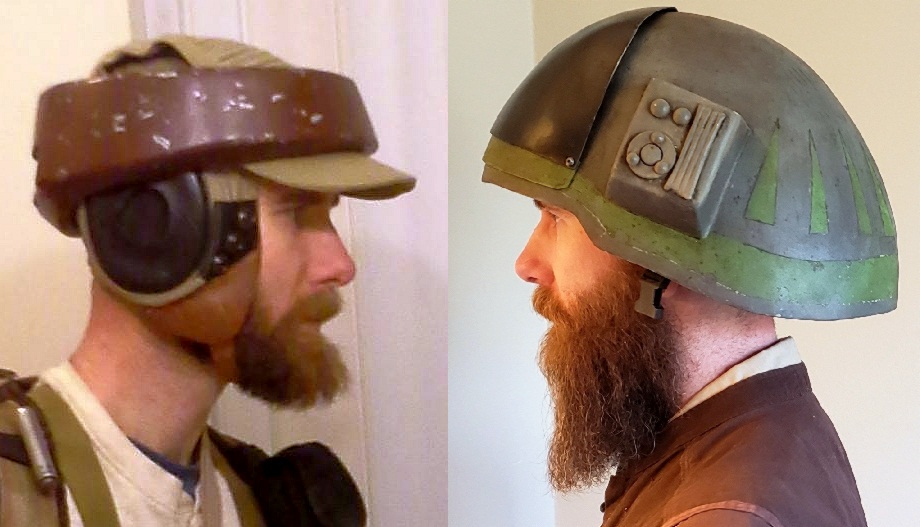
While I was never really onboard with the ‘pearl hats’ of the Royal Guards or the Security Guards and Officers’ visored caps, the headgear of one RSF branch felt like it had more Star Wars-y pedigree than the others: the Naboo Starfighter Corps. Their flight helmet is so iconic yet has such a grounded design I thought it might be fun to add one to my kit…and after supper one night in our tent I made a quick doodle of what a Naboo partizan might look like wearing one:

Once we returned home, I was able to do some research and see what kinds of options I had. Somewhat unsurprisingly (?) it doesn’t seem as if many fan-makers have tackled the N1 helmet…as far as I could tell, only one other (rather exquisite) fanmade example existed, produced by one ‘Godzilla’ (of super-accurate Tusken Raider mask fame). Perhaps one reason for this dearth was because an official N1 helmet replica does exist…they pop up on eBay from time to time but are typical quality for Don Post – they’re basically just a cast plastic shell with a mediocre paintjob – and more than I want to pay for such a thing. After being away from my workshop for so long, I really needed a project to get back in the Maker groove, and thought a scratchbuilt Naboo pilot helmet would do the trick nicely! The obvious question was: HOW?
While I’m not sure how the onscreen helmets were actually constructed, I have a feeling they were sculpted, vac-formed, and painted to look like leather, but weren’t actually leather. The simple panel construction would be fairly easy to replicate with heavy leather (perhaps something in the 10-12 oz range), but that would be well beyond my present budget, and as no 3D models seem to exist for such an underappreciated prop, 3D printing was also off the table. (This is just as well, as the strong Naboo ethic of handmade craftsmanship seems like it would be at odds with the paradigm of 3D printing).
With a local comic con looming on the horizon about eight weeks out, however, I realized the perfect method for scratchbuilding a one-off prop in a reasonably short timeframe was one I had really enjoyed before (but hadn’t been able to use in years) – good ol’ PEPAKURA.
(The technique of Pepakura, it you’re not familiar with it, involves building a shape using a heavy cardstock or cardboard, coating it with a hardening resin, and then adding a runny layer of ‘Rondo’ (Bondo filler + resin) for additional strengthening; the form is then sanded and painted. In terms of finishing, it’s very similar to a 3D printed prop, but using a paper product as the base instead of filament or resin.)
After deciding on technique, my first roadblock became clear…drafting the pattern from scratch would require lots of trial and error. Luckily, I came across a fellow in Germany who had accuratized a Don Post helmet by adding actual leather over the plastic panels – and he had posted pictures of his pattern pieces! Excellent! However, he didn’t have anything in the pictures to give scale. My attempts to reach him were unsuccessful, but I eventually found a Rebel Legion member who had one of the Don Post helmets.
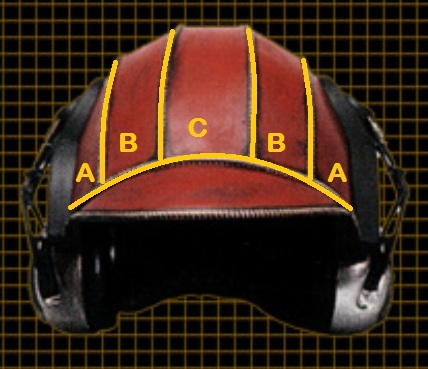
I queried her for the measurement of the width of the central strip C, but she replied back with what was apparently the width of B+C+B – and with the fraction’s denominator missing! If it was meant to be 6&1/2 inches, B+C+B would be 16.51 cm; if it was 6&1/4 inches, then B+C+B would be 15.875 cm.
While the size of all the panels was up in the air, I realized that there was one other component that could provide a known measurement I could use as a baseline! According to the Parts of Star Wars, the earmuffs used on the helmet were 3M model 1450, which are sadly discontinued. However, some judicious image searching revealed an identical model made by MSA is still being produced (though the price appears to have jumped about $10 since I ordered them in early February). With a pair of these (and my trusty calipers) in hand, I now had plenty of known measurements available!
However, I didn’t have a head-on image of the helmet that was high-rez enough to see the earmuff clearly. Hence, I would have to use a profile picture and work my way towards getting the measurements I needed. I was able to use an online scaling tool to find the front width of leather section ‘A’, and plugged that number into the overhead view of the disassembled pieces of ‘C-B-A’ to figure what ‘B+C+B’ would be.
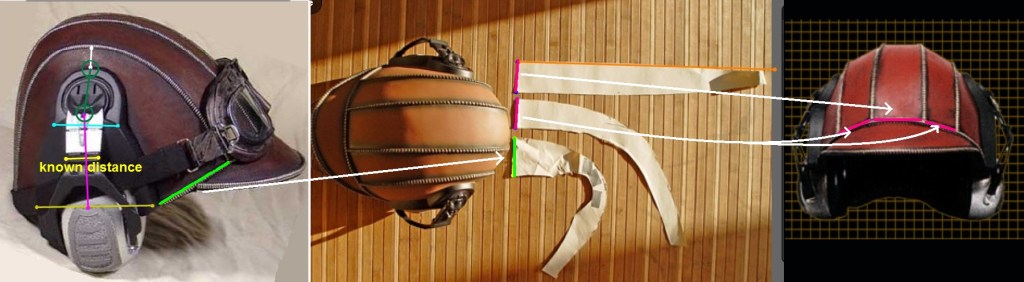
If I did my math correct, the front B+C+B should be close to either 15.875 or 16.51 cm. Adding up the measurements from the scaling tool gave me 17.1 cm – only .5 cm off 16.51, and which I considered well within the acceptable margins considering the low-rez pictures I was forced to use!
Using a picture of the helmet’s rear, I verified the measurements I was given by the RL member of ‘B-C-B’ at the rear bottom; the scaling tool spit out a width of 8.3 cm or 3.27 inches, and I was told this distance was 3.25 – plenty close enough for me! Now time to print out patterns and get to crafting (process and results in Part 2 and Part 3)!
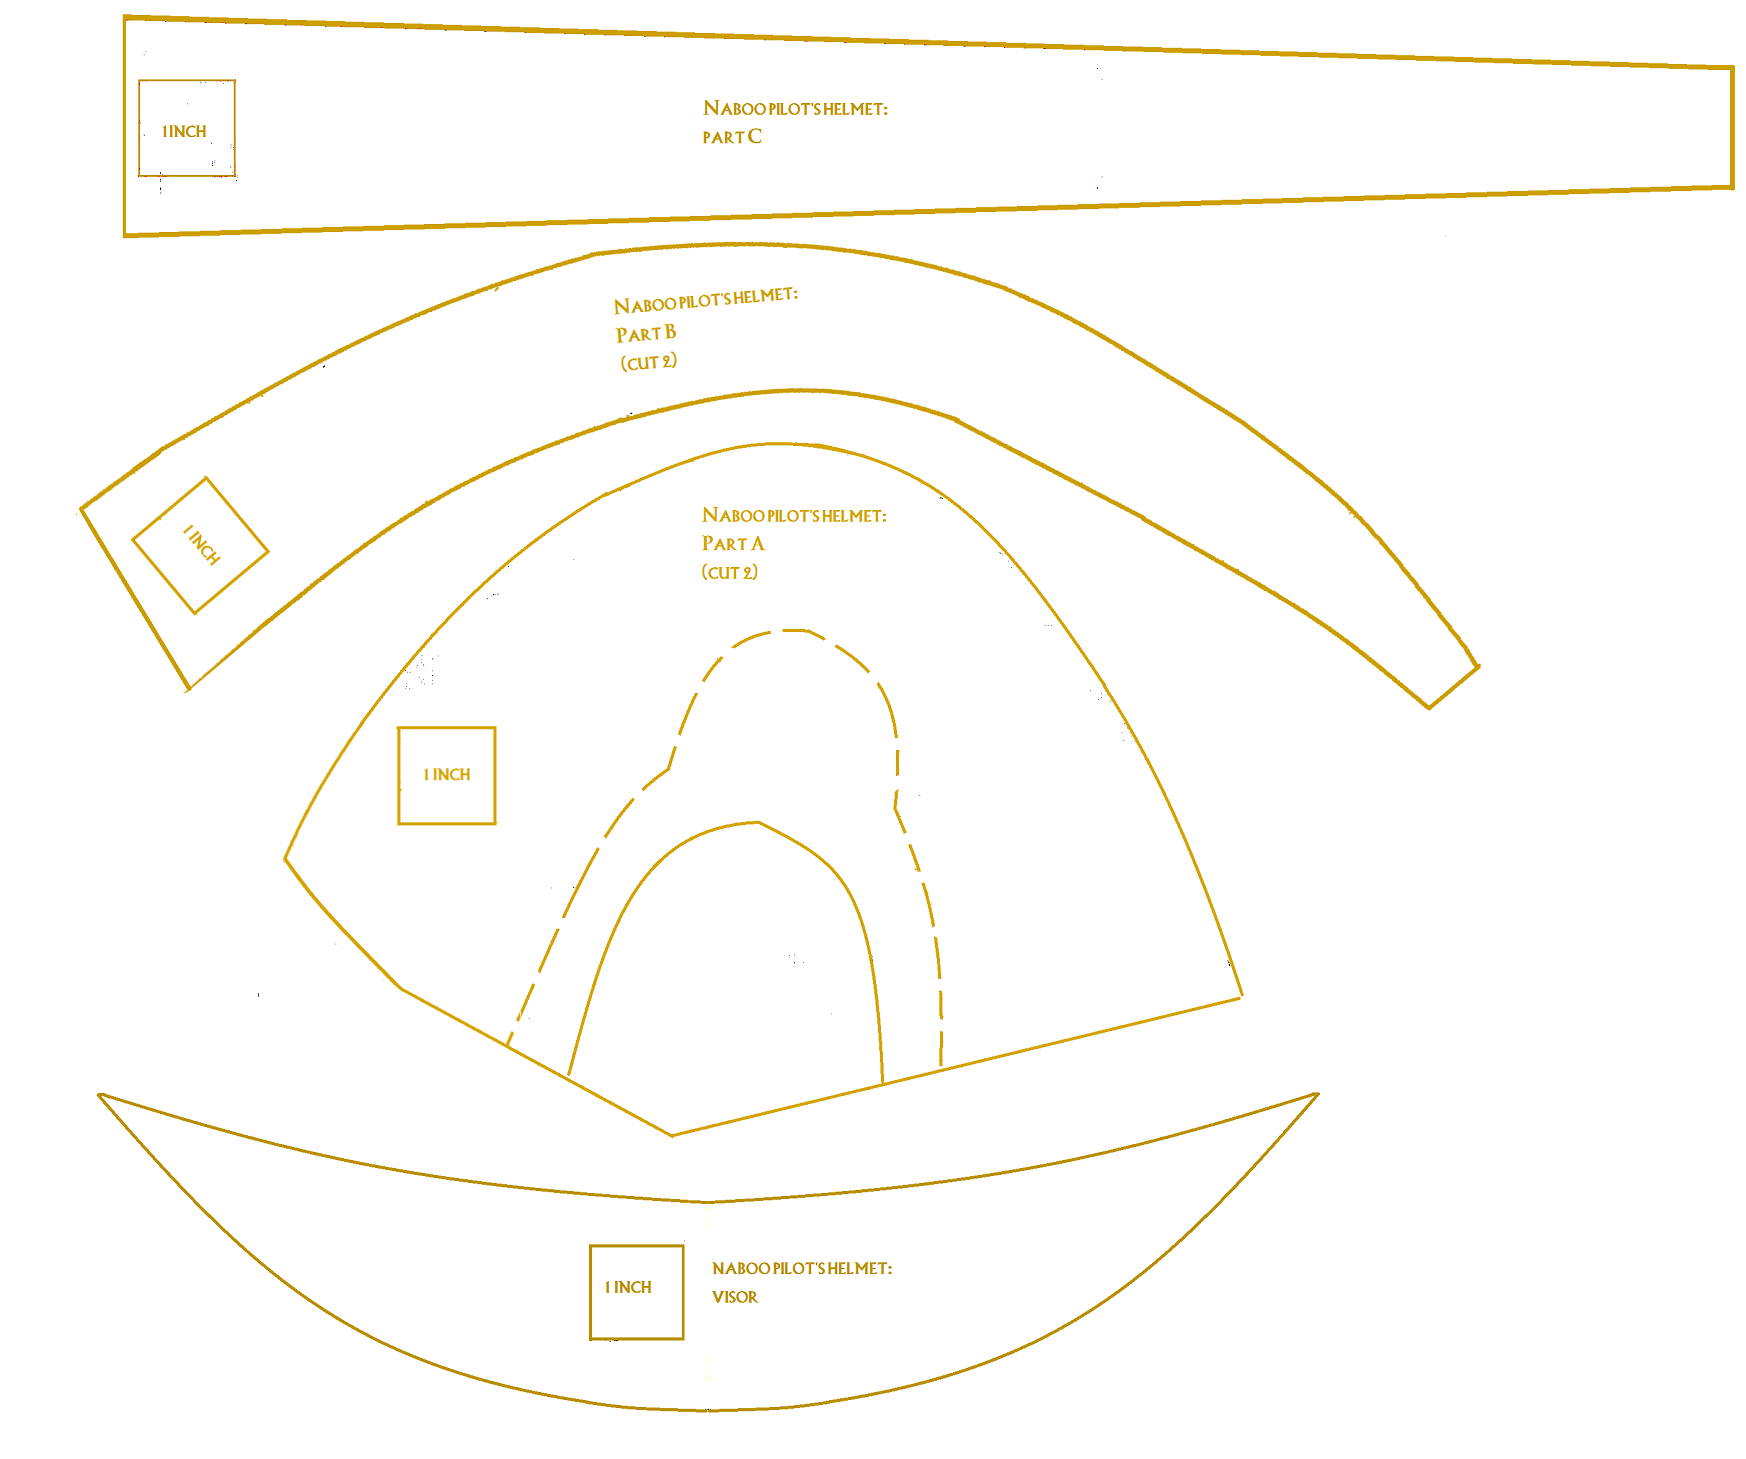
For those of you interested in trying your hand at crafting your own N1 helmet, I’ve scanned my pattern pieces for download here – just print out so that the boxes are one inch square!
Researching, writing, and compiling this site takes a lot of time and energy. If you’ve enjoyed reading or have learned something from this project, please consider supporting my work with a small donation below! Thank you!
Make a one-time donation
Make a monthly donation
Choose an amount (US dollars only – unfortunately, I cannot currently accept Republic credits 😉
Your contribution is greatly appreciated and will help me continue to keep this blog ad-free!
(Alternately, you can support my work via ko-fi as well.)
Your contribution is greatly appreciated and will help me continue to keep this blog ad-free!
(Alternately, you can support my work via ko-fi as well.)
